
A Box for all
Seasons
Seasons
A properly constructed nestbox does a pretty good job of battling the outdoor environment, but sometimes it could use a little extra help. The following ideas can improve how the nestbox stands up to the elements, better protecting the birds inside.
Closed Position
Open Position
Home | Site Map | Disclaimer | Contact Us
Copyright © 2012 NestboxBuilder.com
This site was last updated on 01/01/2016
Copyright © 2012 NestboxBuilder.com
This site was last updated on 01/01/2016
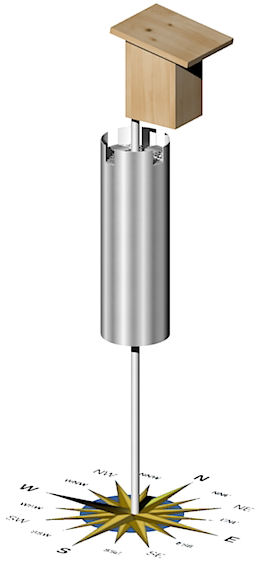
Compass Direction
The direction you face the nestbox will affect both how the box handles the elements and the safety of the nestlings.
Wind and Rain
Wind generally blows from the west, but topography, structures and trees may change the predominant direction. Identify the prevailing wind at your site and face the nestbox away from it to avoid exposing the entry to windswept rain.
Sunlight
Facing a nestbox west allows afternoon sunlight to penetrate the entry and strike the interior, which can superheat the nestbox.
A due east heading will expose the entry to the morning sun, but in cool climates, or at the beginning of the season, this could be an advantage, helping warm the box after a chilly night.
An easterly heading, therefore, is good place to start, but is it best for your site? To determine the exact direction, there are other, non weather-related factors to consider.
Safety of fledglings on their first flight
A tree, or better yet, a line of trees or a forest edge, should be within 100 feet of the entry, and reasonably in front of it, to provide a safe landing spot for the fledgling's first flight. Avoid facing a nestbox toward a road or a building or wall.
Monitoring from a distance
For yard boxes especially, you'll want to view the entry from your favorite vantage point. This not only allows you to enjoy the comings and goings of the birds during nesting season, but enables you to spot changes in their normal behavior that might indicate potential problems.
Afternoon Shade
A nestbox will reach its highest interior temperature late in the afternoon. If possible, locate the nestbox so it will be in partial or full shade during this time. Afternoon shade can help a nestbox stay 20 degrees cooler than a nestbox in full sun.
When placing a nestbox, don't mount it beneath overhanging tree limbs or near other structures that might provide predators access to your nestbox.


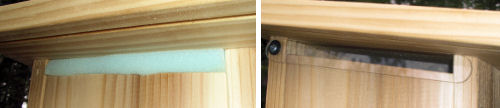
Vent Covers
Vent covers are generally used as a means of sealing off the air flow to help nestlings during cold weather, or to minimize CO2 emissions during black fly hatches. But vent covers are also useful in extreme weather to prevent wind driven rain from entering the vents.
A vent cover can be as sophisticated as a rotating shutter installed with a pivot screw (left), or as simple as stuffing the vent with foam rubber or insulation (below, left).
Clear vent covers (below, right) can be cut from a large plastic bottle, or from Plexiglas or lexan. Clear covers don't change light levels inside the box when they're closed, and allow inspecting the roof for paper wasps without the need to open a closed vent.
Adequate Nestbox Ventilation
By expelling accumulated hot air, nestbox vents help reduce dangerous heat buildup inside the nestbox, which can be lethal to nestlings. The amount of ventilation area needed is typically decided by the prevailing climate of the region: minimal (or none) for cool climates, more for warm. But temperatures today are reaching extremely high levels over most of the country during the nesting season. The versatile nestbox - a box for all seasons so to speak - should be equipped with enough ventilation area to handle the hottest temperatures you're likely to encounter in your state or province. Remember, it is much easier to close or block vents than it is to add them, especially in the field.
By expelling accumulated hot air, nestbox vents help reduce dangerous heat buildup inside the nestbox, which can be lethal to nestlings. The amount of ventilation area needed is typically decided by the prevailing climate of the region: minimal (or none) for cool climates, more for warm. But temperatures today are reaching extremely high levels over most of the country during the nesting season. The versatile nestbox - a box for all seasons so to speak - should be equipped with enough ventilation area to handle the hottest temperatures you're likely to encounter in your state or province. Remember, it is much easier to close or block vents than it is to add them, especially in the field.
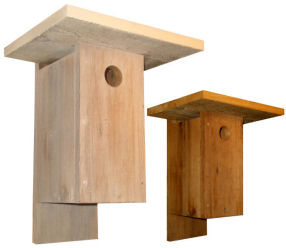
Increasing ventilation on a side opening nestbox
Because the roof on side opening nestboxes is usually attached to the front and back panels, we're free to cut the side panels shorter, creating a gap that serves as the vent. By varying the side height we can easily achieve the venting area we need.
First remove the door panel and trim an appropriate amount from the top (dotted line at left). Next remove the opposite side panel and do the same. If your nestbox has been glued together, or put together with nails, you can trim this fixed panel in place using a small saw.
Increasing ventilation on a front opening nestbox
Roofs on front opening boxes are attached to the sides, so we can't simply shorten the sides to create venting. The easiest solution for front opening boxes is to drill one or more 3/4" diameter holes in the sides. Locate these holes as close to the top of the side as possible to reduce the possibility of rain entering the holes. (3/4" diameter is .44 square inches, so it will take six (three per side) to equal the amount of venting in a standard NABS nestbox).

Paint Nestboxes a Light Color
In just a few seasons, a nestbox can weather to a dark hue which can lead to dangerous overheating. Light colored nestboxes will reflect more sunlight, keeping the box, and the interior, much cooler.
If you prefer a more natural look rather than a solid color, you can dilute a light-colored latex paint 50-50 with water apply it with a brush. The thinned paint will lighten the box and at the same time allow some of the woodgrain to show through.
The weathered box in the photo at left was painted with the 50-50 mixture of latex paint.


Caulking
Inspect your nestboxes at the beginning of each season for open seams and cracks that may have developed. Use caulk to seal them.
If you're building a new nestbox, apply silicone caulk to the seams before assembly for a weather resistant seal.
Be sure to read and follow the instructions on any adhesive or caulk you plan to use, for your safety as well as the occupants of your nestboxes.

Heat Shields
A heat shield is a panel that blocks sunlight from reaching the nestbox. Shields are installed using small wooden blocks or nylon spacers which create an airspace between it and the underlying nestbox panel, preventing heat transfer to the box.
Material for shields can be made from 1/4" plywood (painted for longevity), reflective sun shades for cars, pvc sheet, or it can be made from the same material as the nestbox itself.
Shields are typically placed over the west-facing nestbox panel and over the roof. When installing a shield over side panels, insure they don't block vents. A panel placed over the nestbox door should be sized to allow opening and closing.
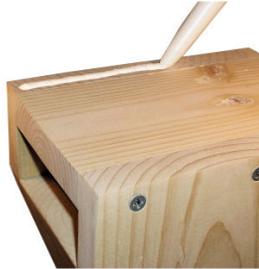
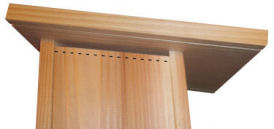
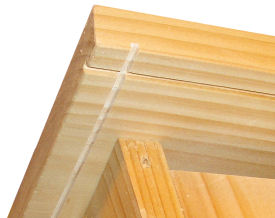
Drip Kerfs
A drip kerf is a shallow groove cut on the underside of the nestbox roof (usually done with a table saw). This groove helps prevent rainwater from migrating underneath the roof, where it can find its way to nestbox openings.
Saw kerfs on the rear of pitched roof nestboxes are only marginally effective, as surface tension combined with roof pitch may allow rainwater to get past the groove. You can avoid this problem with the next tip.
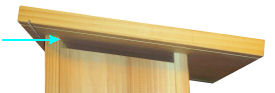
Rear Drip Rail
Because we face the nestbox entry away from prevailing winds, the rear of the nestbox will face toward these winds. A pitched roof exposes more of the back panel and the roof underside to wind driven rain, which can find its way into the vents. If your pitched-roof nestbox interior is constantly getting wet in rainstorms, this is the likely culprit.
To prevent this, install a rear block under the roof as shown at left. Apply caulk to the block and attach with screws. If you have drip kerfs, caulk the ends of these as well to prevent water seeping into the groove.
This block also doubles as a convenient sparrow spooker mount.
A drip kerf is a shallow groove cut on the underside of the nestbox roof (usually done with a table saw). This groove helps prevent rainwater from migrating underneath the roof, where it can find its way to nestbox openings.
Saw kerfs on the rear of pitched roof nestboxes are only marginally effective, as surface tension combined with roof pitch may allow rainwater to get past the groove. You can avoid this problem with the next tip.
Rear Drip Rail
Because we face the nestbox entry away from prevailing winds, the rear of the nestbox will face toward these winds. A pitched roof exposes more of the back panel and the roof underside to wind driven rain, which can find its way into the vents. If your pitched-roof nestbox interior is constantly getting wet in rainstorms, this is the likely culprit.
To prevent this, install a rear block under the roof as shown at left. Apply caulk to the block and attach with screws. If you have drip kerfs, caulk the ends of these as well to prevent water seeping into the groove.
This block also doubles as a convenient sparrow spooker mount.

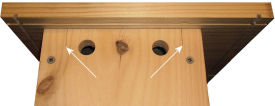
Position of roof screws
Above, a vent cover made from thin wood pivots on a screw. Right, a vent blocked with foam rubber. And at far right, a plexiglas vent cover.
Avoid roof screws when drilling ventilation holes by marking their location beforehand.
Roof Modifications
The nestbox roof can be improved in a number of ways to increase its ability to protect the nestbox.
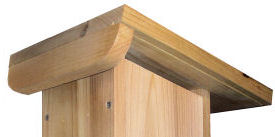
Extend the Overhangs
If your nestbox doesn't have adequate overhangs (at least 3" in the front; 1" on the sides) you can either replace it with a larger panel, or apply a second roof (which also serves as a heat shield). Because the main roof will provide the primary sealing for the nestbox, a second roof can be made of thinner and less expensive materials, such as 1/4" plywood.
Paint the Roof
Not only will a coat of paint extend the roof's life considerably, painting it a light color will reduce the amount of heat it absorbs, keeping the nestbox cooler.
The nestbox roof can be improved in a number of ways to increase its ability to protect the nestbox.
Extend the Overhangs
If your nestbox doesn't have adequate overhangs (at least 3" in the front; 1" on the sides) you can either replace it with a larger panel, or apply a second roof (which also serves as a heat shield). Because the main roof will provide the primary sealing for the nestbox, a second roof can be made of thinner and less expensive materials, such as 1/4" plywood.
Paint the Roof
Not only will a coat of paint extend the roof's life considerably, painting it a light color will reduce the amount of heat it absorbs, keeping the nestbox cooler.
Black flies and venting
Black flies find prey in the same manner as mosquitoes, following traces of C02 from birds and animals. Popular belief is that vented nestboxes allow C02 to escape from more openings, increasing the chances of black fly attacks. Closing or blocking the vents, therefore, may help minimize black fly intrusion, although recent studies prove that no nestbox, vented or not, is immune to these predators.
Black flies find prey in the same manner as mosquitoes, following traces of C02 from birds and animals. Popular belief is that vented nestboxes allow C02 to escape from more openings, increasing the chances of black fly attacks. Closing or blocking the vents, therefore, may help minimize black fly intrusion, although recent studies prove that no nestbox, vented or not, is immune to these predators.