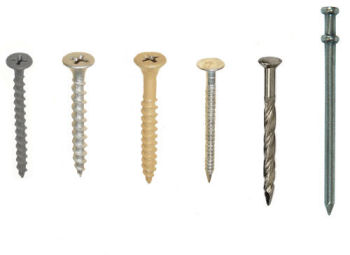
Pictured (left to right): Coarse thread drywall screw; galvanized deck screw; polymer-coated deck screw; ring-shank roofing nail; spiral siding nail; duplex head nail
Nestboxes should be held together with either screws or nails of the proper type.
Screws
Screws will hold a nestbox together with tighter joints, they won't work their way loose plus they allow you to easily remove a panel if it needs repair or replacing. Screws are more expensive than nails, however, and are a little more time-consuming to install.
Deck screws, either galvanized or polymer coated, will outlast the nestbox. Coarse-thread sheetrock screws are less expensive but will rust over time. The 1 5/8" length is readily available and works well in most cases.
Nails
The best type nails to use are ring-shanked, spiral or cement coated, all of which help prevent the nail from backing out, and should have a thin, "box nail" type shank. A 2" (6d) size nail is a good size for most nestbox construction.
What not to use
Common nails have smooth, large diameter shanks which tend to split the relatively thin panels of a nestbox, and are prone to backing out over time.
Brad nails or staples will nearly always work their way loose. Using them to temporarily hold a nestbox together before installing screws or nailing is common practice, but they should never be used as primary fasteners in a nestbox.
Nestbox Fasteners
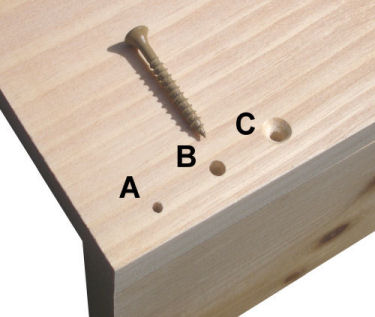
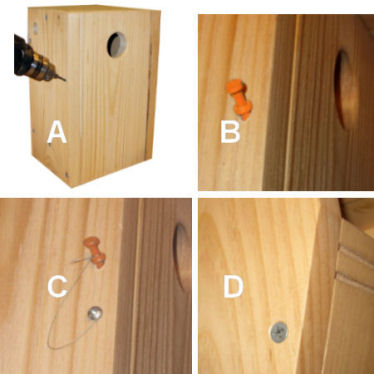
Securing the door panel
The nestbox door panel must have a method of keeping it securely closed, both to keep the occupants secure inside, and to help keep unwanted things outside.
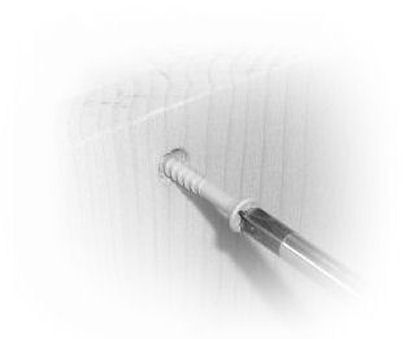
The most convenient method is using a duplex head nail. To stop the nail from working its way out, drill the hole at a slight downward angle through the outer panel and into the door of the nestbox (A). Painting the head of the nail a bright color (B) will make it easier to find if it's dropped. Securing it with a piece of string will prevent it getting lost in the first place (C).
The down side of using a nail is its lack of security on boxes installed in public or vandalism prone areas.
Securing the door panel with a phillips or square drive head (D) will usually stop the overly curious, as people are less apt to open a box if a tool is required.
The nestbox door panel must have a method of keeping it securely closed, both to keep the occupants secure inside, and to help keep unwanted things outside.
The most convenient method is using a duplex head nail. To stop the nail from working its way out, drill the hole at a slight downward angle through the outer panel and into the door of the nestbox (A). Painting the head of the nail a bright color (B) will make it easier to find if it's dropped. Securing it with a piece of string will prevent it getting lost in the first place (C).
The down side of using a nail is its lack of security on boxes installed in public or vandalism prone areas.
Securing the door panel with a phillips or square drive head (D) will usually stop the overly curious, as people are less apt to open a box if a tool is required.
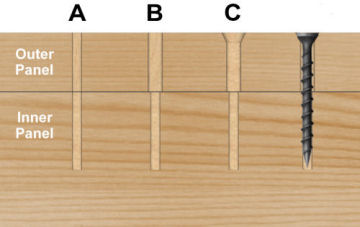
Pre-drilling for fasteners
Pre-drilling makes it easier for the screw to its job. And that job is simple: pull two pieces of wood together into a tight joint.
Because we use mostly softwoods for nestboxes, it's tempting to drive a screw into the panels with no pre-drilling at all. But we risk splitting the wood, and since the screw would be cutting threads in both panels, no amount of tightening will get the joint as tight as it could be.
Example A shows a small (1/8") pilot hole drilled into both the outer and inner panel. This will minimize splitting, but the screw will still cut threads in the outer panel so the joint can't be pulled completely tight.
In example B, a clearance, or shank hole, was drilled into the outer panel, and a smaller pilot hole was drilled into the inner panel. The screw can now turn freely in the clearance hole and will only cut threads in the inner panel. The screw will then pull the inner panel tightly against the outer panel as it's tightened. By continuing to tighten the screw, the head will countersink itself, although it will crush the wood's fibers doing so.
Example C shows a countersink added to the clearance hole, which will allow the screw's head to seat cleanly without crushing the wood.
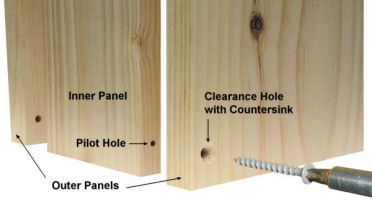
Door pivots
The traditional method of hinging a door panel on a nestbox is the pivot system. The pivots are usually a pair of opposing screws but nails can be used as well.
The outer panels are pre-drilled with clearance holes to allow the screws to pivot freely inside the hole as the door is opened or closed. The screws are driven through these clearance holes into the door, or inner panel, creating the pivot. Pre-drilling pilot holes in the door will help avoid splitting the wood.
In the example at left we've added a countersink to the outer panels so the same screws used for construction of the box can also be used for the pivots.
Building a nestbox tutorials
Nestbox materials
Tools
Fasteners
Entrance holes
Adhesives and caulk
Finishing
Nestbox materials
Tools
Fasteners
Entrance holes
Adhesives and caulk
Finishing
Home | Site Map | Disclaimer | Contact Us
Copyright © 2012 NestboxBuilder.com
This site was last updated on 01/01/2016
Copyright © 2012 NestboxBuilder.com
This site was last updated on 01/01/2016