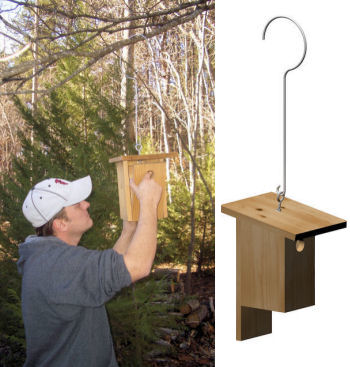
Hanging Nestboxes
There are circumstances where conventional nestbox mounts don't work, or don't work well. In congested urban areas for example, pole-mounted boxes would be in far greater danger from human predators than hanging boxes would be from natural predators. Other locations may offer prime habitat, but might not allow ground mounted boxes. In these situations, hanging nestboxes in trees may be the sole opportunity to provide safe housing for cavity-nesters.
Those who have tried this method have discovered other advantages in hanging nestboxes. Trees and their foliage shade the boxes, keeping them much cooler than their grounded counterparts. Relocating a box becomes a simple matter of retrieving the box and moving it from one tree or limb to another. And fledglings don't need to make their first, vulnerable flight to the safety of the trees. They're already there.
In this article we will introduce the basic mechanics of hanging nestboxes so you may decide for yourself if the method is right for you and/or your target habitat.
Because hanging nestboxes is a specialized technique, it's not without a learning curve. It's highly recommended that you practice with an empty box and at lower heights before you go "live".
Hook-to-Nestbox Attachment Methods
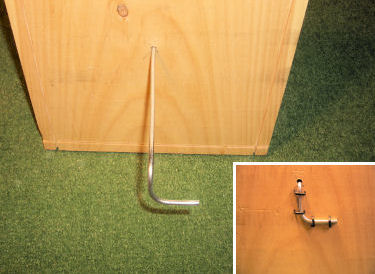
L Bends and Staples
Using a drill bit the same diameter of the wire or rod being used, drill a hole through the nestbox roof at the balance point. After bending the hanger loop, insert the plain end of the hook through this hole, then make two one-inch right angle bends as shown at left.
Align the hanger with the roof (open part of hanger loop facing the rear of nestbox), then secure these bends to the underside of the roof with staples (inset). Apply caulk to prevent the staples from working loose and to waterproof the hole.
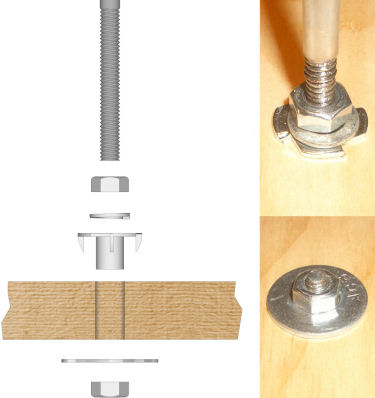
Threaded 1/4" Rod
You will need the hardware shown in the sketch at far left. It's best to buy stainless steel hardware to avoid rust.
1. Thread about 3" on one end of a 1/4" rod. Most auto mechanics and machine shops can do this for you. If you want to try this yourself, use a 1/4-20 die in a die handle, and be sure to use cutting oil as you thread the rod.
2. Using a drill bit the diameter of the T-nut shaft, drill a hole through the roof at the balance point. Hammer the T-nut into this hole.
3. Thread a 1/4-20 nut and lock washer onto the 1/4" rod and screw the rod into the T-nut, extending about 1/2" below the roof bottom. Finish by attaching a fender washer and a 1/4-20 nut on the roof underside, then tighten the top nut against the T-nut/lock washer. Use caulk on all parts to seal and waterproof the assembly.
Note: the T-nut is an important component - it will allow tightening the top nut enough to secure the hanger without crushing the roof.
L Bends and Staples
Using a drill bit the same diameter of the wire or rod being used, drill a hole through the nestbox roof at the balance point. After bending the hanger loop, insert the plain end of the hook through this hole, then make two one-inch right angle bends as shown at left.
Align the hanger with the roof (open part of hanger loop facing the rear of nestbox), then secure these bends to the underside of the roof with staples (inset). Apply caulk to prevent the staples from working loose and to waterproof the hole.
Threaded 1/4" Rod
You will need the hardware shown in the sketch at far left. It's best to buy stainless steel hardware to avoid rust.
1. Thread about 3" on one end of a 1/4" rod. Most auto mechanics and machine shops can do this for you. If you want to try this yourself, use a 1/4-20 die in a die handle, and be sure to use cutting oil as you thread the rod.
2. Using a drill bit the diameter of the T-nut shaft, drill a hole through the roof at the balance point. Hammer the T-nut into this hole.
3. Thread a 1/4-20 nut and lock washer onto the 1/4" rod and screw the rod into the T-nut, extending about 1/2" below the roof bottom. Finish by attaching a fender washer and a 1/4-20 nut on the roof underside, then tighten the top nut against the T-nut/lock washer. Use caulk on all parts to seal and waterproof the assembly.
Note: the T-nut is an important component - it will allow tightening the top nut enough to secure the hanger without crushing the roof.
Nestbox Hanger Hooks
Listed below are the common materials used for fabricating the nestbox hook, most of which are readily available at home centers and hardware stores.
9-Gauge Wire (galvanized)
Approximately 1/8" diameter, 9-guage wire is the easiest to bend but also the least strong. Use for lightweight boxes (the wire may be doubled to increase its strength). Usually sold in 50 to 75' coils.
3/16" Metal Rod (zinc plated)
Fairly easy to bend, stronger than 9-guage wire. Sold in 36" lengths. Use for light to medium weight boxes.
1/4" Metal Rod (zinc plated or stainless steel)
Harder to bend but strongest option, suitable for heavier boxes. Sold in 36" lengths. Stainless steel rods available at online metal suppliers.
Eye Level
At sites where vandalism would not be a problem, suspending a nestbox at eye level is an ideal way of enjoying the benefits of hanging boxes without the complex retrieval systems needed for "high" level boxes.
Virtually any nestbox may be used, even those with a pitched roof. And all that's required is an eyebolt fastened to the nestbox roof and a hanger hook. Just add an extra small bend at the bottom of the hook to engage the eyebolt.
Tipping
Excessive tipping will occur if the nestbox is off center (front-to-back) in the cradle (far left photo). Small, shallow nestboxes with large roofs are more prone to tipping than deeper boxes.
To minimize tipping, the wire basket or wood rim should be sized to provide just enough clearance for the nestbox being used, about 1" to 1 1/2" larger than the box. The nestbox should remain reasonably level regardless of its position in the cradle.
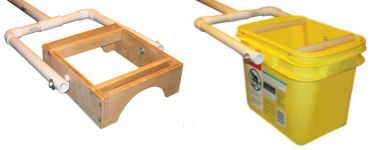
To accommodate boxes of different sizes, you can fit the wood rim (or the plastic pail) with removable spacers as shown in the photo at left.
Excessive tipping will occur if the nestbox is off center (front-to-back) in the cradle (far left photo). Small, shallow nestboxes with large roofs are more prone to tipping than deeper boxes.
To minimize tipping, the wire basket or wood rim should be sized to provide just enough clearance for the nestbox being used, about 1" to 1 1/2" larger than the box. The nestbox should remain reasonably level regardless of its position in the cradle.
To accommodate boxes of different sizes, you can fit the wood rim (or the plastic pail) with removable spacers as shown in the photo at left.

Choose sturdy, live tree limbs which the hook can easily slip over. Place the hanger on a limb on the high side of upright branches or between two branches to prevent the box from "walking" along the tree limb.
To minimize a hanging nestbox swaying in severe winds, select trees with natural barriers to the prevailing winds, such as other nearby trees or structures. The length of the hanger will affect the sway. The longer the hanger (branch to roof) the wider the arc of the sway.
Never attempt raising or lowering boxes if a thunderstorm is in the area. Lightning can strike from a thunderstorm as far as 25 miles away, even if you have blue skies overhead. And remember, you'll be carrying a potential lightning rod!
Don't install hanging nestboxes in the vicinity of electrical wires or electrical devices.
The traditional duplex head nail we commonly use as a door latch can hang up in a wire basket or wood rim. A screw or screw hook is the better choice.
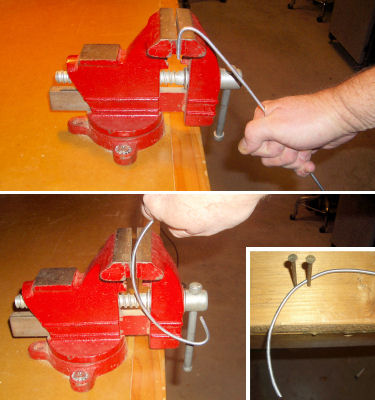
Bending a nestbox wire hook
To shape the nestbox hook, insert a couple of inches of the wire or rod into a table-mounted vise grip. Lock it in and push down on the rod to make a small bend at the end (left photo, top). This optional safety bend adds a measure to insure the hanger doesn't accidentally slip off the limb.
Loosen the vise grip slightly and shape the hook by using slight pulls as you move the rod length through the vise to complete the hook (left photo, bottom).
Tip: A gallon paint can is about 6 3/4" in diameter and can be used as a template to check roundness as you bend the wire or rod.
Left Photo, inset: If you don't have a bench vise, hammer two nails into a 2x4 and shape the wire between the two nails.
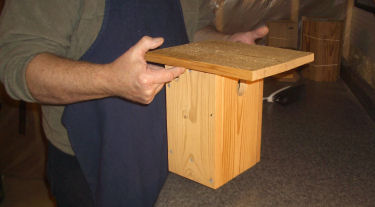
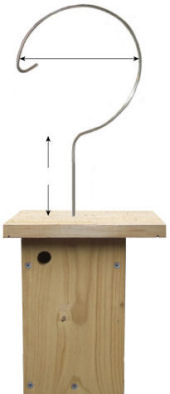
Determine the correct hanger location
Lift the box with your fingertips positioned at a point where the box tilts slightly downward at the front. Mark this spot, then measure the roof for the side-to-side centerline. The intersection of these two points will provide the correct location of the hanger hook.
Lift the box with your fingertips positioned at a point where the box tilts slightly downward at the front. Mark this spot, then measure the roof for the side-to-side centerline. The intersection of these two points will provide the correct location of the hanger hook.
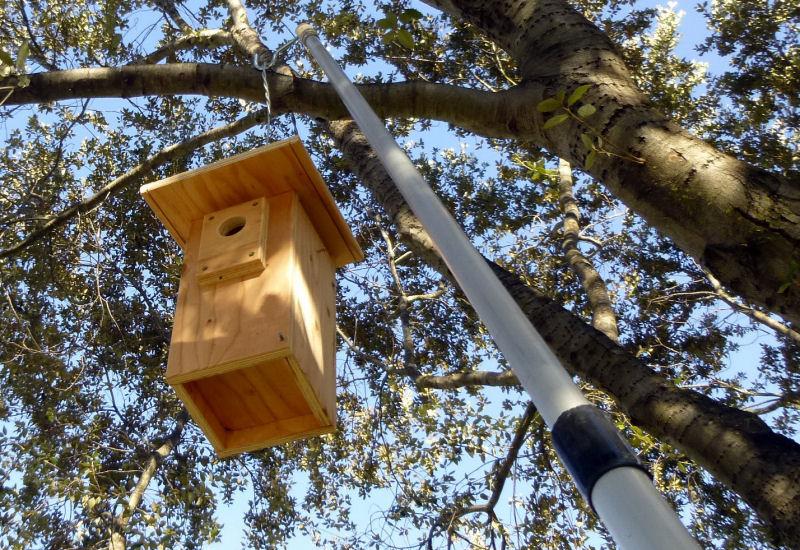
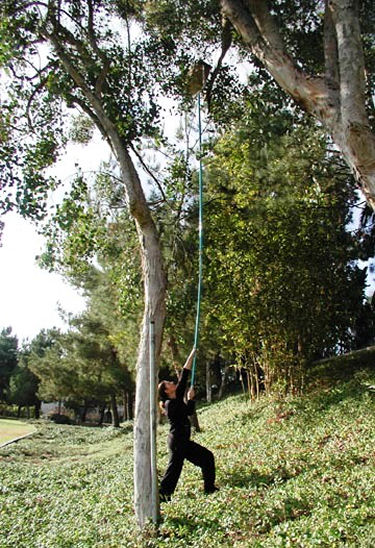
Equipment required
Hanging a nestbox on a tree limb up to twenty feet high, and retrieving it for monitoring, obviously requires some fairly specialized equipment. The basic system consists of three components:
1. Nestbox Hanger Hook
A heavy wire or metal rod is bent into the shape of a hook and rigidly attached to the nestbox. The nestbox/hook assembly is then placed over a tree limb.
2. Telescoping Pole
Painter's extension poles are sold at major home centers and hardware stores. They are available in several lengths, the most common being 6' (extends to 12') and 8' (extends to 16'). Your height and reach will add about six feet to these lengths.
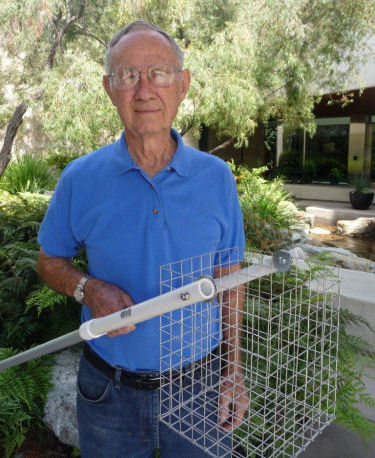
3. Purvis Lifter or a retrieval hook
The Purvis Lifter (pictured at left) consists of two parts. The yoke is made of 3/4" pvc tubing and fittings. The cradle, which can be a wire basket, a plastic pail or a wood rim, fits inside the yoke and is free to pivot, keeping the nestbox level during lifting and retrieving. The lifter assembly is then attached to the end of a telescoping pole using screws. Note: pitched roof nestboxes can work if the basket is properly sized. For a wood rim, use only flat roofed nestboxes.
You can download a copy of the Purvis Lifter plans here:
Southern California Bluebird Club
The Retrieval Hook is an alternative to the basket. It's attached directly to the telescoping pole (no yoke is required). Hooks are lightweight, inexpensive and easy to make from a common paint roller. Solid wood handles are best. Make sure the handle has internal threads to attach to the end of the telescoping pole. Nestboxes with either flat or pitched roofs may be used, as gravity will keep the nestbox level.
A: A large screw hook is threaded into a paint roller handle. A detailed plan for this hook can be found here:
Lee Pauser's Retriever Hook
B: The wire that normally holds the roller is bent into the shape shown. The optional safety bend keeps the nestbox hook from sliding off the retriever hook if the pole is lowered past horizontal. Attach a hose clamp to the end for added strength.
Hanging a nestbox on a tree limb up to twenty feet high, and retrieving it for monitoring, obviously requires some fairly specialized equipment. The basic system consists of three components:
1. Nestbox Hanger Hook
A heavy wire or metal rod is bent into the shape of a hook and rigidly attached to the nestbox. The nestbox/hook assembly is then placed over a tree limb.
2. Telescoping Pole
Painter's extension poles are sold at major home centers and hardware stores. They are available in several lengths, the most common being 6' (extends to 12') and 8' (extends to 16'). Your height and reach will add about six feet to these lengths.
3. Purvis Lifter or a retrieval hook
The Purvis Lifter (pictured at left) consists of two parts. The yoke is made of 3/4" pvc tubing and fittings. The cradle, which can be a wire basket, a plastic pail or a wood rim, fits inside the yoke and is free to pivot, keeping the nestbox level during lifting and retrieving. The lifter assembly is then attached to the end of a telescoping pole using screws. Note: pitched roof nestboxes can work if the basket is properly sized. For a wood rim, use only flat roofed nestboxes.
You can download a copy of the Purvis Lifter plans here:
Southern California Bluebird Club
The Retrieval Hook is an alternative to the basket. It's attached directly to the telescoping pole (no yoke is required). Hooks are lightweight, inexpensive and easy to make from a common paint roller. Solid wood handles are best. Make sure the handle has internal threads to attach to the end of the telescoping pole. Nestboxes with either flat or pitched roofs may be used, as gravity will keep the nestbox level.
A: A large screw hook is threaded into a paint roller handle. A detailed plan for this hook can be found here:
Lee Pauser's Retriever Hook
B: The wire that normally holds the roller is bent into the shape shown. The optional safety bend keeps the nestbox hook from sliding off the retriever hook if the pole is lowered past horizontal. Attach a hose clamp to the end for added strength.
Safety Bend
45°
30°
Hose clamp
A
B
Large screw hook
A nestbox is placed high above the reach of humans using a telescoping pole. Above, a box is retrieved using a simple hook attached to the end of the pole (photo by Lee Pauser). Below, Linda Violett hangs a nestbox using the Purvis Lifter.
1/4" rod
threaded 3"
threaded 3"
1/4" nut
1/4" lock washer
1/4" T-nut
Nestbox roof
Fender washer
1/4" nut
Dick Purvis holds his creation, the Purvis Lifter.
6" - 7" dia.
4" - 6"
Safety Bend
(Optional)
(Optional)
Front of Nestbox

Telescoping pole
Before deciding on any mounting system, we should first determine which predator(s) will pose the greatest threat in our particular habitat, and what guards are available to deter them.
In urban areas with frequent and concentrated human traffic, natural predator populations are usually low, so vandalism and theft are the biggest concerns. In this situation, we simply place the nestbox far above the reach of humans. Height becomes our predator guard.
The landscaping around golf courses, cemeteries and public parks provides another barrier to natural predators. Manicured grounds offer little cover to predators, making it risky for them to hunt. These greenbelt habitats also have another predator deterrent - people.
In rural habitat, brush and other cover beneath and around the trees provide safer hunting conditions for natural predators. Because human presence in this type habitat is minimal, a hanging nestbox will be at greater risk from climbing predators. You can reduce this risk by selecting isolated trees with little or no cover nearby. Placing the nestbox five feet or more from the main trunk will protect it further. If you have severe predator problems in a particular habitat, such as a high population of climbing snakes, pole mounted boxes with stovepipe baffles might be the better choice.
Ants
Applying grease to the hanger hook is not recommended without a means of protecting the birds against accidental contact. See the Predator Controls/Insect Barriers section for a safe way to apply grease.
A special thanks to the following people for their contributions and help:
Lee Pauser, Dick Purvis, Linda Violett and Bob Walshaw
Lee Pauser, Dick Purvis, Linda Violett and Bob Walshaw
Final Pointers
Predators

Home | Site Map | Disclaimer | Contact Us
Copyright © 2012 NestboxBuilder.com
This site was last updated on 01/01/2016
Copyright © 2012 NestboxBuilder.com
This site was last updated on 01/01/2016